Button コントロールをインキュベーター化してみる
WPF の学習は悲しいかなまだまだ匍匐前進中で、独学だと判らない部分も多いため、先日あえて基礎から学び直そうと MSさんが大手町トレーニングセンターで開催してるセミナー 「Visual Studio 2010 ではじめる WPF プログラミング 応用編」に行ってまいりました。
ブレンドの操作方法や ImtesControl・Visual State Manager の使い方、後いくつか勘違いしてた箇所の誤りを学習できて非常に有意義なセミナーでした。で、帰ってからちくちく復習したり、学んだことを基に現行プロジェクトの問題点を修正したりしてる訳ですが、頂いた資料読んでるうちふつふつ良からぬ心が湧いてきました。そう、Button コントロールをインキュベーター化するという黒い心ですw WPF の Q&A で丸いボタンのサンプルがなかったこともあったのでちゃちゃっと作ってみました。
まずは通常のボタンの状態。
VB で新規にWPF プロジェクトを作成し、Window のサイズや Grid の列と幅を調整した後 Button を貼り付けます。あえて VB というとこが味噌ですねw
<Window x:Class="MainWindow"
	xmlns="http://schemas.microsoft.com/winfx/2006/xaml/presentation"
	xmlns:x="http://schemas.microsoft.com/winfx/2006/xaml"
	Title="MainWindow" Height="200" Width="350">
	<Grid>
		<Grid.ColumnDefinitions>
			<ColumnDefinition Width="0.5*" />
			<ColumnDefinition Width="2*" />
			<ColumnDefinition Width="3*" />
			<ColumnDefinition Width="2*" />
			<ColumnDefinition Width="0.5*" />
		</Grid.ColumnDefinitions>
		<Grid.RowDefinitions>
			<RowDefinition Height="1*" />
			<RowDefinition Height="2*" />
			<RowDefinition Height="1*" />
		</Grid.RowDefinitions>
		<Button Content="Button" Grid.Column="1" Grid.Row="1" Name="Button1" />
		<Button Content="Button" Grid.Column="3" Grid.Row="1" Name="Button2" />
	</Grid>
</Window>
次に Button をインキュベーター化してみましょう。ControlTemplate で Button の外観をカスタマイズします。ControlTemplate はこんな感じになります。
<Style TargetType="Button" >
	<Setter Property="Template">
		<Setter.Value>
			<ControlTemplate>
				<Grid>
					<Grid.ColumnDefinitions>
						<ColumnDefinition Width="1*" />
						<ColumnDefinition Width="1*" />
						<ColumnDefinition Width="1*" />
						<ColumnDefinition Width="1*" />
						<ColumnDefinition Width="1*" />
						<ColumnDefinition Width="1*" />
						<ColumnDefinition Width="1*" />
						<ColumnDefinition Width="1*" />
						<ColumnDefinition Width="1*" />
					</Grid.ColumnDefinitions>
					<Grid.RowDefinitions>
						<RowDefinition Height="1*" />
						<RowDefinition Height="1*" />
						<RowDefinition Height="1*" />
						<RowDefinition Height="1*" />
						<RowDefinition Height="1*" />
						<RowDefinition Height="1*" />
						<RowDefinition Height="1*" />
						<RowDefinition Height="1*" />
						<RowDefinition Height="1*" />
					</Grid.RowDefinitions>
					<Ellipse Grid.RowSpan="9" Grid.ColumnSpan="9">
						<Ellipse.Fill>
							<LinearGradientBrush EndPoint="0.5,1" StartPoint="0.5,0">
								<GradientStop Offset="0" Color="LightPink" />
								<GradientStop Offset="1" Color="Orchid" />
							</LinearGradientBrush>
						</Ellipse.Fill>
					</Ellipse>
					<Ellipse Grid.Row="2" Grid.Column="2"
							 Grid.RowSpan="5" Grid.ColumnSpan="5">
						<Ellipse.Fill>
							<SolidColorBrush Color="DarkRed" ></SolidColorBrush>
						</Ellipse.Fill>
					</Ellipse>
					<Ellipse Grid.Column="1" Grid.ColumnSpan="3"
							 Grid.Row="1" Grid.RowSpan="3"
							 Fill="White" Margin="6" />
				</Grid>
			</ControlTemplate>
		</Setter.Value>
	</Setter>
</Style>
この Template を Window のリソースに定義します。
<Window x:Class="MainWindow"
	xmlns="http://schemas.microsoft.com/winfx/2006/xaml/presentation"
	xmlns:x="http://schemas.microsoft.com/winfx/2006/xaml"
	Title="MainWindow" Height="200" Width="350">
	<Window.Resources>
		<Style TargetType="Button" >
			<Setter Property="Template">
				<Setter.Value>
					<ControlTemplate>
						<Grid>
							<Grid.ColumnDefinitions>
								<ColumnDefinition Width="1*" />
								<ColumnDefinition Width="1*" />
								<ColumnDefinition Width="1*" />
								<ColumnDefinition Width="1*" />
								<ColumnDefinition Width="1*" />
								<ColumnDefinition Width="1*" />
								<ColumnDefinition Width="1*" />
								<ColumnDefinition Width="1*" />
								<ColumnDefinition Width="1*" />
							</Grid.ColumnDefinitions>
							<Grid.RowDefinitions>
								<RowDefinition Height="1*" />
								<RowDefinition Height="1*" />
								<RowDefinition Height="1*" />
								<RowDefinition Height="1*" />
								<RowDefinition Height="1*" />
								<RowDefinition Height="1*" />
								<RowDefinition Height="1*" />
								<RowDefinition Height="1*" />
								<RowDefinition Height="1*" />
							</Grid.RowDefinitions>
							<Ellipse Grid.RowSpan="9" Grid.ColumnSpan="9">
								<Ellipse.Fill>
									<LinearGradientBrush EndPoint="0.5,1" StartPoint="0.5,0">
										<GradientStop Offset="0" Color="LightPink" />
										<GradientStop Offset="1" Color="Orchid" />
									</LinearGradientBrush>
								</Ellipse.Fill>
							</Ellipse>
							<Ellipse Grid.Row="2" Grid.Column="2"
									 Grid.RowSpan="5" Grid.ColumnSpan="5">
								<Ellipse.Fill>
									<SolidColorBrush Color="DarkRed" ></SolidColorBrush>
								</Ellipse.Fill>
							</Ellipse>
							<Ellipse Grid.Column="1" Grid.ColumnSpan="3"
									 Grid.Row="1" Grid.RowSpan="3"
									 Fill="White" Margin="6" />
						</Grid>
					</ControlTemplate>
				</Setter.Value>
			</Setter>
		</Style>
	</Window.Resources>
	<Grid>
		<Grid.ColumnDefinitions>
			<ColumnDefinition Width="0.5*" />
			<ColumnDefinition Width="2*" />
			<ColumnDefinition Width="3*" />
			<ColumnDefinition Width="2*" />
			<ColumnDefinition Width="0.5*" />
		</Grid.ColumnDefinitions>
		<Grid.RowDefinitions>
			<RowDefinition Height="1*" />
			<RowDefinition Height="2*" />
			<RowDefinition Height="1*" />
		</Grid.RowDefinitions>
		<Button Content="Button" Grid.Column="1" Grid.Row="1" Name="Button1" />
		<Button Content="Button" Grid.Column="3" Grid.Row="1" Name="Button2" />
	</Grid>
</Window>
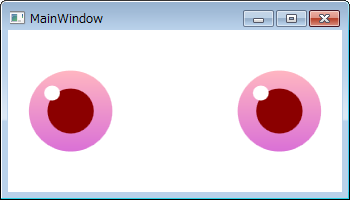
実行すると、Button がインキュベーター化します。
見た目は変わっても Button コントロールの機能はそのままなので、クリックすれば当然 Button.Click イベントが発生します。試しにこんなイベント設けてみるのもいいでしょう。
Option Explicit On
Option Strict On

Class MainWindow
	Private Sub Button1_Click(sender As System.Object, e As System.Windows.RoutedEventArgs)
		MessageBox.Show("僕と契約して XAML 少女になってよ")
	End Sub

	Private Sub Button2_Click(sender As System.Object, e As System.Windows.RoutedEventArgs)
		MessageBox.Show("わけわかんないよ")
	End Sub
End Class
<Button Content="Button" Grid.Column="1" Grid.Row="1" Name="Button1" Click="Button1_Click" />
<Button Content="Button" Grid.Column="3" Grid.Row="1" Name="Button2" Click="Button2_Click" />
Livet 0.98RC が出たら、次はインキュベーターさんの MVVM 化に挑戦したいと思ってますw
そういやこないだ嫁から「けいおん!」は見ないの?と尋ねられたんで、「けいおん!」はヤマなしオチなしだから面白くない、俺はまどまぎみたいに黒いストーリーが好きなんよと言ったら「心が病んでる・・・」とぼそっと言われましたw

